
GUIDE / MYXPENG
XPENG G9 Space and Cargo: Prospective UK Buyer Checklist
For the renewed European G9 announced in July 2025, XPENG quotes 660 litres behind the rear seats, 1,576 litres folded and a 71-litre front compartment. Those figures are a starting point: check your real passengers and largest regular load in the exact car, and do not transfer them to the forthcoming UK G9L.

What the dimensions can tell you
The same announcement gives a 2,998 mm wheelbase. It does not tell you whether a particular wheelchair, pushchair or child-seat combination fits. Cabin features and seat equipment also need checking against the selected derivative and market.
Run a useful fit check
- Confirm the actual model and derivative. For a UK offer, obtain its dated UK specification; the current UK list names G9L as coming soon, separately from G9.
- Set occupied seats for the people who normally travel. Keep their child seats fitted and charging cables in the normal storage location.
- Measure the rear opening, load floor, lip and usable height below the parcel shelf. Try the largest regular item without forcing seats or trim.
- Check that luggage can be secured and visibility remains usable. Include occupants, luggage, accessories and towbar equipment in the vehicle’s permitted load.
- Try entry, headroom, legroom, grab points and rear access with your actual passengers. Check mobility aids and child-seat access before committing.
- While parked, try the seat and climate controls you need. Confirm heating, ventilation, massage, audio and other important equipment on the order, rather than assuming a global photograph proves it.
Fold the rear seats and put them back securely
On the G9 covered by the English 2025 V5.6.0 handbook, the rear-seat folding switches are on the right-hand side of the boot. The seats are raised and latched by hand afterwards. Use this sequence for that equipped G9; a UK G9L needs its own matching instructions.
- Make room for the backrest to move. Empty the seat and remove luggage or a fitted restraint that blocks its travel. Check the space in front of and behind it.
- Use the seat-folding switch in the right boot panel. Match the seat symbol to the backrest you want to lower and watch it move. The same panel also has suspension-height buttons on equipped cars: the car/up-arrow and car/down-arrow buttons change loading height, not the seat position.
- To restore a backrest, first pull its seat belt clear. Lift the backrest by hand and push it back until it locks. Gently pull it forward to check that the latch holds, and check the belt runs freely rather than being caught behind it.
- Only then adjust the sitting angle. Use the rear-door backrest switch, holding it forwards or backwards and releasing it at the required angle. Check the restored seat and belt before anyone sits there.
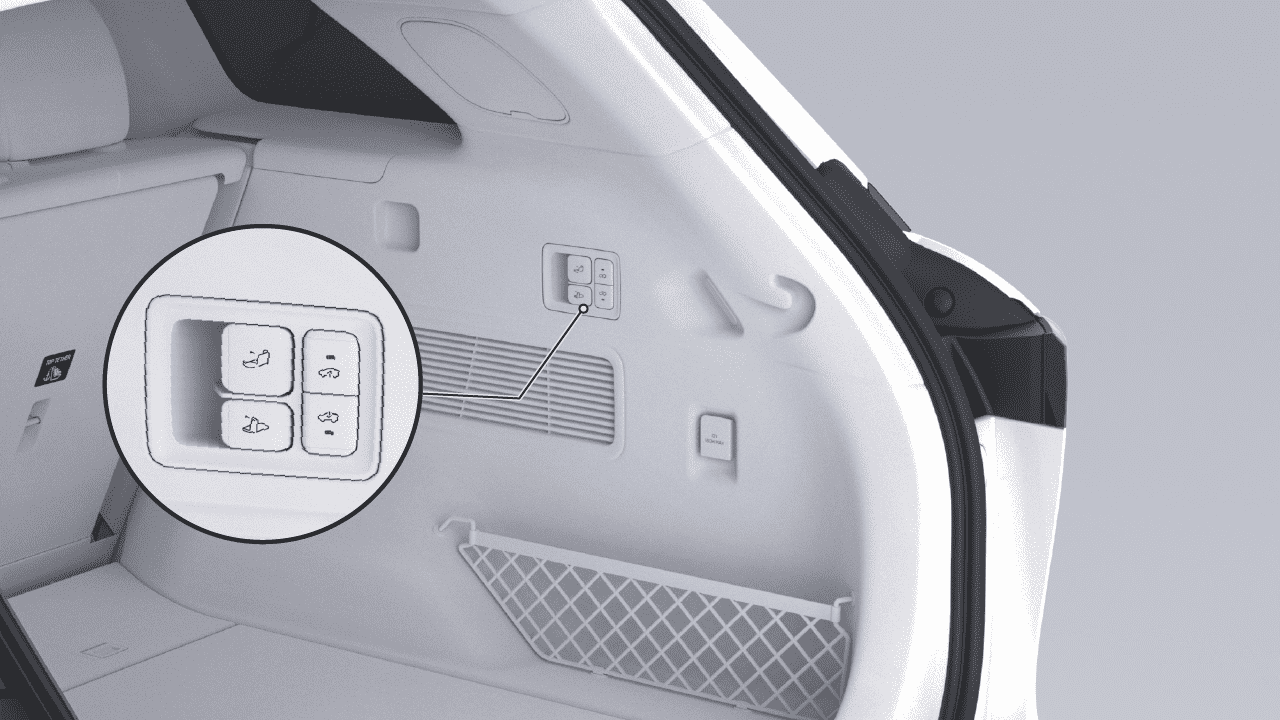
If the backrest does not move or lock: stop pressing the switch, clear any visible obstruction and check that the belt is not trapped. Do not force the mechanism. If it still will not latch, leave that seat unused and ask for the backrest latch and folding mechanism to be checked; say which side fails and whether it moves but will not lock, or does not move at all.
If something does not fit
Identify the limiting opening or dimension, then repeat with a permitted seat position or the actual alternative item. Keep enough room for every travelling passenger and restraint. If the fit, payload or accessibility remains unsuitable, ask for a different documented configuration before paying a non-refundable deposit.
For towing or a carrier, use the exact vehicle plate and market-approved equipment documents. Vehicle size and cargo litres do not establish a permitted towing or carrier load.
Sources checked 23 October 2026: Current XPENG UK model list; XPENG handbook directory; XPENG global G9 model page; XPENG European launch announcement, 11 July 2025. European 2025 model claims are dated context, not UK G9L specifications.
Rear-seat controls checked 27 October 2026: G9 English 2025 V5.6.0 handbook, printed pages 205–206 (PDF pages 203–204). Illustration from the same handbook’s boot-control panel. The physical latch check and obstruction branch are practical checks, not a guaranteed repair.