
GUIDE / MYXPENG
Earlier UK XPENG G6 puncture kit: use it, check pressure and know when to stop
The earlier UK G6's boot contains a compressor and a single-tyre sealant kit for a temporary small-puncture repair. Use it only in a safe place away from traffic, with the matching kit and a suitable puncture; a flat tyre, torn sidewall or failed pressure check is not permission to continue driving.
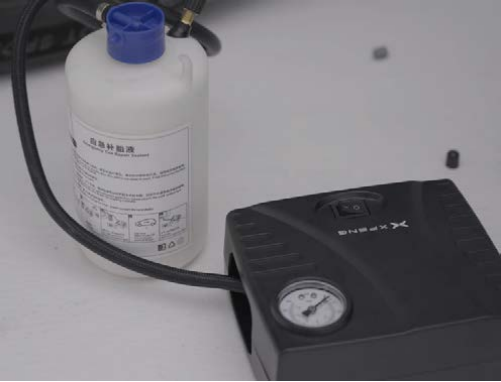
These steps follow the original UK G6 handbook, printed 272–277 / PDF 273–278. Match the bottle, hoses, pump and instructions supplied with your car. A different kit can have a different connection sequence and compressor duty limit.
If you are stopped on a motorway
Do not attempt the repair or place a warning triangle on the motorway. If it is safe to leave, exit on the side away from traffic and wait well away from the vehicle and moving traffic, behind a barrier where available. If you cannot reach relative safety and cannot exit safely, keep belts and hazards on and call 999 for police. Otherwise obtain breakdown help from a safe position. Do not drive on a flat tyre to carry out the kit's test run.
Check whether this kit is suitable
The handbook's procedure is for a small puncture under 6 mm. It excludes major tread damage, sidewall damage, tears and a tyre displaced from its wheel. If the damage cannot be assessed, or the tyre was driven flat, choose recovery and inspection rather than guessing it is a sealable hole.
Check the sealant expiry date and the kit label before opening it. Use the specified XPENG sealant type and capacity; this bottle serves one tyre. Read the tyre-pressure label on your actual car for the correct load-dependent target. The temporary-repair failure threshold below is not the normal driving pressure.

Connect, inflate and recheck
- Park away from traffic, select P and secure the vehicle. Take the matching kit out of the boot and note the correct tyre-pressure target from the car label. Do not start unless the damage and sealant checks above pass.
- Shake the sealant bottle well. Keep it upright. Screw its injection hose securely onto the tyre valve, then connect the other sealant hose to the compressor as the kit diagram shows. Do not invert the bottle.
- Connect the compressor power lead to the vehicle's 12 V power socket in the storage box, as this handbook directs. Use the supplied plug; this procedure does not require exposed battery-terminal connections.
- Switch on the compressor and watch its gauge. The handbook describes a temporary 300–600 kPa indication during sealant injection; that is not your tyre's target pressure. Stop inflation when the tyre reaches the value on its pressure label.
- If the target cannot be reached within 20 minutes, the handbook treats the repair as failed. Stop sooner if the kit label requires it or operation becomes abnormal. Do not take the short test drive after a failed inflation; use recovery instead.
- Switch the pump off before disconnecting. Remove the injection hose from the valve, wipe surplus sealant from the valve and wheel, disconnect the hose from the compressor and stow the kit.
- Only after successful inflation, use a suitable safe route immediately for the handbook's distribution drive: 3 miles or 10 minutes at 7–22 mph. This spreads the sealant. If you cannot make that low-speed journey safely, arrange recovery rather than entering fast traffic.
- Stop safely and measure pressure again. Below 130 kPa (1.3 bar, about 19 psi), the handbook says the temporary repair has failed: do not continue the journey. At or above that threshold, reinflate to the actual tyre-label target before further travel; 130 kPa itself is not a safe normal target.
- After a successful recheck and inflation, go promptly for professional tyre inspection, repair or replacement. The handbook specifies 12–49 mph for that onward journey and a maximum of 49 mph after sealant. Choose a route that permits those limits safely; otherwise use recovery. Tell the technician sealant has been used and replace the consumed bottle.
What a successful check means
The tyre reaches its label pressure, passes the short-drive recheck and can be returned to that pressure. This is a temporary way to reach inspection, not proof of a permanent repair or permission for normal-speed travel. A renewed pressure warning, visible deflation or abnormal handling means stop safely and use recovery.
If it fails, give recovery the useful details
Say you have a G6 with a puncture, whether the tyre is visibly flat or damaged, whether sealant was used, the target pressure and the actual gauge reading after inflation or the short drive. Give your safe location privately to the breakdown provider. Ask for recovery or the appropriate tyre service rather than another attempt to drive on a failed repair. The tyre technician needs to inspect the tyre, including possible damage from low-pressure driving, before deciding repair versus replacement.
Before your next journey
Check that a replacement bottle of the specified type/capacity is in date, the compressor and hoses are present and the kit is accessible. A bottle already used for one tyre is not a reserve for a second puncture. For an ordinary low-pressure warning without suitable puncture damage, use the tyre-pressure checks rather than injecting sealant automatically.
UK roadside rules reviewed 26 October 2026: The Highway Code, rules 275–277. The motorway branch follows UK rules; the handbook's generic warning-triangle diagram is not a UK motorway instruction.
Evidence reviewed 26 October 2026: original UK G6 handbook, printed272–277/PDF273–278. Kit limits, connection, inflation, distribution drive,130kPa failure threshold and temporary-speed limits read from the full pages. Match your supplied kit and its duty limit. Suitable-route and comparison wording is editorial guidance; no later G6 kit equivalence or permanent tyre repair is certified.
Open source